Some years ago, when my first two were small, and the mommy gig was new to me, I realized that my maternal toolbox was missing an essential skill: the making of truly fantabulous brownies. At the time, the internet was in a fledgeling state, all ASCII, no images, but I ran an internet wide contest for The Best Brownies Ever. I got tons of submissions, and for 6 weeks we baked several pans of brownies daily....cakey brownies, chewy brownies, fudgey brownies, every sort and size you can imagine.
My husband, at first ecstatic to return home to our warm and chocolate scented kitchen, soon learned to dread the nightly plate of brownies. "Try them!" we would urge, and judge which was the new best recipe.
Many, many squares of chocolate later, we had our winner. The winning submission was made by Dave Woodall; the recipe was his grandmother's, and we are all fortunate she was the kindly sort of cook who not only shares her recipes, but shares them complete and un-edited, sans strategic omissions and booby-traps...
Today, you can buy those wonderful little One Bite Brownies in the grocery store, and I think they must be based on Dave's grandma's recipe. But nothing beats a pan of these brownies fresh out of the oven, warm and oh so delicious! We love them with good vanilla ice cream.
Grandma Woodall's Brownies
2 squares unsweetened chocolate
1 c. oil, canola or corn
2 c. sugar
3 eggs
1 1/2 c. flour
1 t. baking powder
1 t. salt
1 c. broken nuts (optional)
Mix the flour, baking powder and salt with a whisk.
Just barely melt the chocolate in the oil (in microwave is easiest).
Add all other ingredients in the order shown, taking care that the eggs do not cook in the warmed oil/chocolate mixture, adding flour mixture last.
Pour the completed batter into a greased and floured 9" x 13" pan.
Yes, it has to be that pan size to cook properly!
Bake 350F
30 minutes
Let cool at least 15 minutes before serving.
Optional garnishes:
Press half walnuts into each square before brownies cool.
Drizzle with chocolate glaze...white chocolate looks nice.
Enjoy!
Sunday, September 5, 2010
Monday, August 30, 2010
A Milestone
 |
| Wizard quality free motion machine quilting - by Diane Gaudynski |
I was at the point in my quilting journey where piecing was coming together and I was beginning to make things I actually wanted to quilt up and keep...but that was the problem! How was I to do the quilting?
I had hand quilted when I was younger, before babies arrived and the sewing was put away. But even then, bouts of quilting gave me instant tendonitis in my right forearm. And hand quilting was slo-oooo---ow going. I am not content to wait months to finish any given piece.
The easiest option was to send my quilts out to be quilted by a pro. But the artist in me objected: I wanted to control the quilt creation process from beginning to end. For better or worse!
I could also use my walking foot and quilt in straight lines. While there are times I do like straight line quilting, I would feel too limited if it were the only kind of quilting I could do.
I could learn to free motion. I had already taken one workshop and I wasn't half bad for a raw beginner. But I could see that learning to free motion well was going to take a long time and a lot of practice. At one trunk show, the speaker mentioned that it took her about 300 hours of practice before she felt she was in control of her free motion quilting. Wow. Even if an hour a day practice allowed me to learn to free motion quilt as well as she could, that was going to take me a year!
 |
| by Cassandra Williams - she must have practiced more than a year! |
At first I thought I would just put the quilting on hold for a while. I went back to work on my piecing and design skills, which can always stand a little refining. But with the tops beginning to pile up, I realized I had to change my attitude about free motion quilting. I was deeply reluctant to accept that for a long time, my free motion quilting was going to be herky-jerky and wobbly. I have always hated to hand in less than stellar work, and those high standards applied to my quilting along with all my other endeavours. But those high standards were now getting in my way.
I had to accept my own journey along the learning curve in order to progress in my craft.
I looked at the lap quilt top I had just finished. I loved it! And I really wanted it quilted up so I could use it as fall descended. It was time to learn to free motion. I went out to the discount fabric store and bought 10 metres of high quality, discount priced quilting cotton. It was ugly, but it would do. I made up a stack of 24" square practice quilt sandwiches. I set up my D1 on a home made quilting table setup. And went to work.
I was surprised at how quickly I progressed on simple meandering. After a week of daily practice sessions, I felt that I was ready enough. My meanders are a bit wonky, to be sure, and there are plenty of bobbles where I have not yet mastered the art of stopping, repositioning quilt and hands, and continuing on. And my stitch length varies too much. I get excited or panicky and put the pedal to the metal...not so good for nice, regular stitch length! And I often keep trying to quilt when my hands are totally out of position...that makes for really long stitches as I strain for quickly vanishing control.
Here is my lap quilt all quilted up...what a great feeling it was to take it off the quilting table! Is it perfect? No! Did I improve as I went along? Yes! And was it fun? Totally! Will it be lovely to snuggle under my new lap quilt on winter evenings? Oh, yeah!


Next project up is this adorable doll quilt. The sashing and border strips are only 1" wide finished, and I realized I have to have much more control to free motion quilt those creditably than is necessary for large scale meandering. Onward!

Thursday, April 8, 2010
Contemporary vs. Traditional Quilts

I had to post this quilt by Bunny Hill Designs! I thought it did a lovely job of harmonizing the two ends of the quilting spectrum, traditional (the block designs are largely pinwheel, and the plain areas highlight tone on tone quilting) and modern (colour scheme). Isn't it posh? And delightful! And in this case, makes a great quilt for either a baby boy or baby girl.
I am not a huge fan of very psychedelic quilts, particularly those with multiple sharp pointed elements (which remind me uncomfortably of the horrible visual disturbances that accompany migraine headaches), so for the most part, quilts that are typically defined as modern do not draw my eye. But I do like this next quilt, the pattern for which is available at Blueberry Buckle:

I am not a huge fan of very psychedelic quilts, particularly those with multiple sharp pointed elements (which remind me uncomfortably of the horrible visual disturbances that accompany migraine headaches), so for the most part, quilts that are typically defined as modern do not draw my eye. But I do like this next quilt, the pattern for which is available at Blueberry Buckle:

City Park Quilt
It reminds me pleasantly of the patchwork of fields you see whilst flying over the prairies, and of maps and yes, city blocks and parks. And the serene palette (notice the interesting punctuation provided by the two small white squares) is visually rich without feeling like a pop art poster.
Friday, March 26, 2010
Work Quilt #2 by Victoria of Silly BooDilly.

This quilt, possibly the most beautiful I have ever seen, is a perfect example of how simplicity can set the stage for masterful colour and design elements.
Inspirational.
Thursday, March 25, 2010
Color Mastery Exercise #1
The first exercise set you in Color Mastery is to constuct a colour wheel out of fabrics you find in your own stash (or failing that, from magazine photos). I dutifully photocopied the blank colour wheel onto some canvas textured card stock, and went hunting through my stash, with the book opened to the colour wheel page.
I needed that page!
Turns out I am terrible at seeing colour in my head and matching it to fabrics in the real world, but this simple colour wheel exercise was illuminating. I had no trouble with blue, red and yellow, the primary colours. My sense of what they were and which fabrics represented them best was quite accurate. But things began to fall apart when it came to green, purple and orange. Turns out I did not have a clear idea of what those base colours really are. I saw a range of colours as being equivalent, which of course they were not. But with the book's colour wheel at hand, I could match basic green to the basic green fabrics in my stash, putting to one side the yellow greens, and the blue-greens, which suddenly I could see were quite different after all.
Things got even harder with purple. I had one in my stash that approximated the purple on the colour wheel. All the others were actually from the much pinker looking red-violet range (the same range from which most of my favourite pinks are drawn, although some pinks fall squarely into the red family rather than red-violet. I don't tend to like red based pinks very much.).
Orange was nearly my downfall. Again, I had only one true orange fabric in my stash. The other "oranges" I had were all yellow-oranges. I had not thought of them as different until I actually compared them to the colour wheel.
The most difficult colour of all turned out to be red-orange. I had absolutely no awareness of this as a hue all on its own. Couldn't even conjure up a mental image of "red-orange". But again, I compared the red-orange on the colour wheel to my stash...and found ONE fabric that fit the bill. And I was surprised to find I really, really liked that colour. How odd I didn't have more of it!
Here is my finished colour wheel from Exercise 1. Yours would look different, depending on what fabrics you have in your stash. And Maria advises making up additional fabric colour wheels in variations: all prints, or all solids, or all polka dots. More practice will refine your eye and build your familiarity with your stash:

At the end of the exercise, Maria asks "What hues did you have trouble identifying in the colour wheel?"
For me, the hardest were blue-violet (again, I only had one and had always thought of it as a blue), and red-orange, which I had never thought about at all. This led me to ask myself "What hues should I be looking for to round out my stash and build my sense of colour?" I resolved to add:
1. Red-oranges and blue-violets...although I will have to take along the colour wheel at first to keep me "on colour"!
2. Colours I had few examples of. My stash turned out to be mostly blues, greens, and violet-red pinks. Period.When I go stash shopping, I will actively collect blue-greens, purples, oranges, orange-reds, yellows.


Exercise #2 will focus on value...can't wait!
I needed that page!
Turns out I am terrible at seeing colour in my head and matching it to fabrics in the real world, but this simple colour wheel exercise was illuminating. I had no trouble with blue, red and yellow, the primary colours. My sense of what they were and which fabrics represented them best was quite accurate. But things began to fall apart when it came to green, purple and orange. Turns out I did not have a clear idea of what those base colours really are. I saw a range of colours as being equivalent, which of course they were not. But with the book's colour wheel at hand, I could match basic green to the basic green fabrics in my stash, putting to one side the yellow greens, and the blue-greens, which suddenly I could see were quite different after all.
Things got even harder with purple. I had one in my stash that approximated the purple on the colour wheel. All the others were actually from the much pinker looking red-violet range (the same range from which most of my favourite pinks are drawn, although some pinks fall squarely into the red family rather than red-violet. I don't tend to like red based pinks very much.).
Orange was nearly my downfall. Again, I had only one true orange fabric in my stash. The other "oranges" I had were all yellow-oranges. I had not thought of them as different until I actually compared them to the colour wheel.
The most difficult colour of all turned out to be red-orange. I had absolutely no awareness of this as a hue all on its own. Couldn't even conjure up a mental image of "red-orange". But again, I compared the red-orange on the colour wheel to my stash...and found ONE fabric that fit the bill. And I was surprised to find I really, really liked that colour. How odd I didn't have more of it!
Here is my finished colour wheel from Exercise 1. Yours would look different, depending on what fabrics you have in your stash. And Maria advises making up additional fabric colour wheels in variations: all prints, or all solids, or all polka dots. More practice will refine your eye and build your familiarity with your stash:

At the end of the exercise, Maria asks "What hues did you have trouble identifying in the colour wheel?"
For me, the hardest were blue-violet (again, I only had one and had always thought of it as a blue), and red-orange, which I had never thought about at all. This led me to ask myself "What hues should I be looking for to round out my stash and build my sense of colour?" I resolved to add:
1. Red-oranges and blue-violets...although I will have to take along the colour wheel at first to keep me "on colour"!
2. Colours I had few examples of. My stash turned out to be mostly blues, greens, and violet-red pinks. Period.When I go stash shopping, I will actively collect blue-greens, purples, oranges, orange-reds, yellows.

Red-violet.

The elusive red-orange!
Exercise #2 will focus on value...can't wait!
Tuesday, March 23, 2010
Techni-colour
One of the most frustrating aspects of quilting is the not-so-simple task of choosing fabrics for any given project. For my first quilting class, we were pretty much dragooned into buying our class fabrics from the store sponsoring our course. I had no objection to this, but after choosing a focus fabric, wandered the store for half an hour trying, in vain, to find anything that worked with that fabric. I tried another, and once again had absolutely no luck in finding great coordinates. In the end, an ancient fat quarter from my stash saved the day. But since then, I have often walked into a quilt shop and found that while they may have one or two fabrics that work in a given project, they rarely have ALL the fabrics I need. Even when they display collections, most shops cannot afford to stock all the fabrics in any one collection. They pick and choose.
One of our local stores brought in a particularly beautiful line of Asian inspired fabrics. Ten or twelve different bolts were on the wall, along with a kit for making their display quilt. That display quilt featured a luscious fabric in a dark, plummy purple. But was it available for sale off the bolt? No. They had used the entire bolt for kits.
And so began my first foray into online fabric shopping. Since then, I have often bought lovely fabrics online that I could not easily find local coordinates for. And it is very hard to colour match online, as digital images are not completely true to the colour in the actual fabric. What to do?
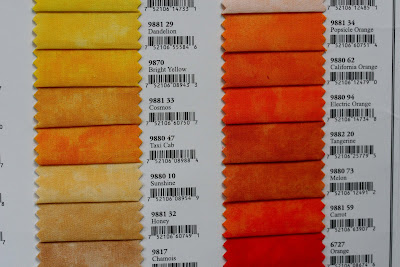
I found an important colour matching tool in the Moda Marbles swatch cards (there is a card for cottons and another, smaller card for the Moda Marbles Flannels. The swatch cards don't just show me what ranges of colours might work best with the focus fabric I have in hand, they give me a colour lingua franca. If I ask one of my online sellers to find me some nice fabrics in blue....well, blue can mean a lot of things. Primary blue? Blue-greens and teals? Periwinkles and violet blues? Turquoise? As you can see, below, "blue" encompasses a large range of possible colours:

But if I say "I want a few fabrics that coordinate with Moda Marble swatch 9873 Wine", then we have a concrete reference point to work from.

I have also found the swatch cards of great use in working my way through my latest workbook, "Color Mastery: 10 Principles for Creating Stunning Quilts" by Maria Peagler. When Maria instructs me to find 5 fabrics to complete a split complement colour scheme, I can use the card swatches to give me a concrete example of the basic colours I am after, enabling me to refine my vision before I go fabric shopping. Turns out I am not terribly good at visualizing colours in my head and then matching that vision to what I find in the real world. Using the swatches helps with that translation process. And I can take the swatches to keep me "on colour" when I am shopping!

I have long wanted to make a baby quilt in a range of neutral flannels along with soft, faded colours also in flannel. But it has been really hard to find a range of neutral flannels and coordinates. For that project, I was able to refine my thinking and then search online for the perfect fabrics, using the Moda Marbles Flannel swatch card as my starting point:

Hope you found this fun and helpful! I will end with a few close up shots of the cotton cards:


One of our local stores brought in a particularly beautiful line of Asian inspired fabrics. Ten or twelve different bolts were on the wall, along with a kit for making their display quilt. That display quilt featured a luscious fabric in a dark, plummy purple. But was it available for sale off the bolt? No. They had used the entire bolt for kits.
And so began my first foray into online fabric shopping. Since then, I have often bought lovely fabrics online that I could not easily find local coordinates for. And it is very hard to colour match online, as digital images are not completely true to the colour in the actual fabric. What to do?
I found an important colour matching tool in the Moda Marbles swatch cards (there is a card for cottons and another, smaller card for the Moda Marbles Flannels. The swatch cards don't just show me what ranges of colours might work best with the focus fabric I have in hand, they give me a colour lingua franca. If I ask one of my online sellers to find me some nice fabrics in blue....well, blue can mean a lot of things. Primary blue? Blue-greens and teals? Periwinkles and violet blues? Turquoise? As you can see, below, "blue" encompasses a large range of possible colours:

But if I say "I want a few fabrics that coordinate with Moda Marble swatch 9873 Wine", then we have a concrete reference point to work from.

I have also found the swatch cards of great use in working my way through my latest workbook, "Color Mastery: 10 Principles for Creating Stunning Quilts" by Maria Peagler. When Maria instructs me to find 5 fabrics to complete a split complement colour scheme, I can use the card swatches to give me a concrete example of the basic colours I am after, enabling me to refine my vision before I go fabric shopping. Turns out I am not terribly good at visualizing colours in my head and then matching that vision to what I find in the real world. Using the swatches helps with that translation process. And I can take the swatches to keep me "on colour" when I am shopping!

I have long wanted to make a baby quilt in a range of neutral flannels along with soft, faded colours also in flannel. But it has been really hard to find a range of neutral flannels and coordinates. For that project, I was able to refine my thinking and then search online for the perfect fabrics, using the Moda Marbles Flannel swatch card as my starting point:

Hope you found this fun and helpful! I will end with a few close up shots of the cotton cards:


Friday, March 19, 2010
Tidiness Tip #1
**update June 04, 2010 at end of this posting**
I am a terrible housekeeper. Well, to be more accurate, I can clean house beautifully but I choose not to. There are just so many other more interesting things to do in a day. In spite of my lack of effort in the housekeeping department, I really hate a mess. And one of the things I have always loathed about sewing and quilting is all the danged little thread tails you are left with once you clip the beginnings and ends of your seams. They get all over the place, and all over me. My husband was forever tut-tutting and picking pieces of thread off my clothes (he can't help himself, my mother in law was a Home Ec major...), a process neither of us enjoyed. So I was overjoyed to find I could actually prevent thread tail formation.
It is called "a scrap piece of fabric". In a nutshell, you sew off the end of whatever it is you are sewing and onto a scrap piece of fabric, leave the needle down in the scrap and cutting your project off behind it. Simple.
But I am a Virgo. Sons of Home Ec majors are well advised to marry Virgos. We are the only sign that can be relied upon to be as picky as their dear Mamma. This Virgo also loathes random fabric scraps all over the place. So I turned to my trusty unbleached cotton yardage, which I buy locally, trés cheap from a discount fabric warehouse. It is thick, slubby, with a drapey hand, and feels like lightweight raw silk. I love the stuff:

I then take a piece of the cloth and cut it into 4 squares, roughly 2" x 2", like so:

Once that is done, I fold the little squares in half, and iron them flat:

To use the scraps, place one under your needle and presserfoot. This all works best if you work with your needle in the needle down setting:

Sew to the edge of the scrap, and with the needle down, lift your presserfoot, position your actual sewing where you want it (in my case I am usually quilting that all important 1/4" seam with my trusty 1/4" with guide presserfoot) and leave a teensy gap between your cloth and your scrap piece. Note the scrap piece is now to the rear of your needle:

Once you have reached the end of your seam, feed another scrap piece under the presserfoot and into the needle, leaving that teensy gap between the scrap and your sewn item, like so:

Now the reason for the gap becomes clear! It is where you clip your sewn item off the scrap piece:

You leave that ending scrap, the one you have sewn off onto, in your machine with the needle down, waiting for your next sewing adventure to begin:

Of course, the scrap you began sewing with is still attached to your sewn item. Clip that off as well:

In this way, you will never, never, never have thread tails to cut off and put in your waste bag or basket, and you will not find you have arrived at a board meeting with thread tails all over your clothes. The floor of your workroom will be beautifully clean...well, it won't have any thread tails...and your little scraps serve two other very important purposes.
First, even that one inch of sewing across the scrap is a short test of your stitch quality. Better to find out on your starting scrap that the machine is sewing wonky than on your sewn item. Second, I find the older scraps, with their many lines of stitching, quite lovely. When I look at them, they remind me of all the happy work I have done, and if I have used coloured thread, that reminds me of whatever project it was used for. Those scraps hold my quilting history!

Update June 04, 2010
An even better idea has been brought to my attention: leaders and enders! Instead of using a little scrap, take all your scrap fabrics and separate them into light and dark. Cut them all into squares, 2 1/2" is standard but choose what works for you and your scrap pile. Note that a cutting tool is really useful for this, I have used my Accuquilt Go! for this purpose and that really reduces the drudgery.
Load the light squares into one basket or bag, the dark into another. Keep the two baskets close by your machine, and whenever you begin or end a seam, take one light square and one dark one, pair them right sides together and sew together using a 1/4" seam. When you cut them off your sewn work, toss them into a third basket.
Over time, you are going to end up with a lovely big pile of sewn pairs. Press them open and then start sewing them together into blocks and quilts. Brilliant!
I saw this idea at Quiltville.com, which also applies a similar technique to deal with small strips and leftovers, the crumbs technique. Check it out, it's well worth a look!
And send me a photo of your results!
Thursday, February 18, 2010
A Cotton Time Christmas
Are y'all familiar with the fabulous Japanese craft magazine Cotton Time? It is very difficult and expensive to get here in North America, but I treated myself to a subscription for Christmas 2009.
I first encountered Cotton Time years ago at sewing Expo in Puyallup, Washington. I had never seen Japanese crafting magazines before and they blew me away. I believe it was in back issue of Cotton Time that I saw a project that haunts me to this day...it was an Advent calendar, done all in the most subtle, sophisticated neutrals. It depicted a landscape, with a road leading to a tiny, hilltop house. Santa was just about to climb down the chimney, and the little pockets depicting the 25 days of Advent were, I think, included in the roadway itself. But the magazine was pricey, and I had already seriously overstepped my sewing expo budget. I passed on that magazine and have regretted that decision ever since!
The text of Cotton Time is, naturally, entirely in Japanese. And you read it "backwards", starting at the right hand cover and and reading right to left toward the left hand cover. The instructions are reasonably well illustrated; most intermediate seamstresses would have little difficulty working out construction strategies. The projects mostly fall into the Zakka category; handmade items for the home with an adorably decorative twist.
In each issue you generally find these Zakka projects for household items, both utilitarian and decorative, a crochet or knitting project, lots of handbags, and some clothing, usually a matching mommy-daughter set.
The designs are unusually restrained, yet joyful and celebratory, and demonstrate a careful use of subtle colour. The use of neutrals to ground and control the designs is masterful. And nowhere is this more artfully demonstrated than in the Cotton Time Christmas editions, which generally come out in November. Below is a lovely shot from the November 2005 issue:


Yes, those yummy shadow boxes. I am determined to make a montage of 5 Christmas shadow boxes modelled on this Cotton Time photo, a little village on a snowy Christmas eve, with one shadow box featuring Santa and his reindeer flying high in the moonlit, snowy sky. I will document the process in a series of entries here on my blog...hope you all enjoy the process and my struggles!
Meanwhile, as I gather materials and energies, I will search for this particular Cotton Time issue, and all the more recent November issues I can find!
I first encountered Cotton Time years ago at sewing Expo in Puyallup, Washington. I had never seen Japanese crafting magazines before and they blew me away. I believe it was in back issue of Cotton Time that I saw a project that haunts me to this day...it was an Advent calendar, done all in the most subtle, sophisticated neutrals. It depicted a landscape, with a road leading to a tiny, hilltop house. Santa was just about to climb down the chimney, and the little pockets depicting the 25 days of Advent were, I think, included in the roadway itself. But the magazine was pricey, and I had already seriously overstepped my sewing expo budget. I passed on that magazine and have regretted that decision ever since!
The text of Cotton Time is, naturally, entirely in Japanese. And you read it "backwards", starting at the right hand cover and and reading right to left toward the left hand cover. The instructions are reasonably well illustrated; most intermediate seamstresses would have little difficulty working out construction strategies. The projects mostly fall into the Zakka category; handmade items for the home with an adorably decorative twist.
In each issue you generally find these Zakka projects for household items, both utilitarian and decorative, a crochet or knitting project, lots of handbags, and some clothing, usually a matching mommy-daughter set.
The designs are unusually restrained, yet joyful and celebratory, and demonstrate a careful use of subtle colour. The use of neutrals to ground and control the designs is masterful. And nowhere is this more artfully demonstrated than in the Cotton Time Christmas editions, which generally come out in November. Below is a lovely shot from the November 2005 issue:

Note that in stark contrast to most western Christmas craft publications, Cotton Time depends heavily on neutrals and understated, primitive colour schemes, a technique which not only lets the design elements shine through, but gives the projects a timeless, classic quality immune to "dating".
So after a disastrous run in to Christmas 2009, in which new work commitments took over my life, and left several Christmas present projects languishing on my work table (now destined to be presents for Christmas 2010!), I resolved to work on my life/work balance, and begin early in the year a couple of simple holiday projects. What better place from which to draw inspiration than Cotton Time. On the hunt I went, and immediately found this image, containing an irresistible project...can you spot it?

Meanwhile, as I gather materials and energies, I will search for this particular Cotton Time issue, and all the more recent November issues I can find!
Thursday, February 4, 2010
A Short History: Buying a Sewing Machine and What That Taught Me..
I had begun quilting years ago, just before my first baby arrived. She was a lovely baby, but a baby who never, never slept. And even once she finally did, at age three, I found that pins and all the intriguing things you use while sewing are not compatible with small children. On top of that, we did not for many years have the sort of house that would support the reality of A Sewing Room. But finally, I arrived at a place in my life and my real estate portfolio, where I could have both time and space for this oddly compelling activity, which is creative but not too creative, and demanding but not too demanding. And with retirement beginning to loom toward me out of the mists of time, it struck me that quilting and zakka type sewing would be a wonderful activity to carry into old age...particularly that part of old age in which I would have limited mobility. I had watched some of my elders, thanks to modern medicine the first generation to reliably expect an extended old age, experience that old age without any kind of roadmap. Their own parents rarely survived into their late '70's, and their only experience of aging, it turned out, was of much younger people. I watched, sad and helpless, as they tried to hammer their 80 year old selves into a template more suited to 50 year olds. It was not a happy experience. That futile effort not only shortened their lives, it degraded the quality of the life they had.
This, I promised myself, would never happen to me.
So part of anticipating my likely long, but increasingly less physically robust old age, was setting the stage with interests and skills that would serve me once hiking, diving and traveling were no longer easy endeavours. I knew there was a whole, wonderful life available to me, even if I tired easily or were confined to my chair. And I very much wanted to make my declining years pleasant for me and less anxiety ridden for my own children.
The first thing I realized, as I waved my eldest off to university, was that my dear old sewing machine, circa 1975 Sears catalogue, was at the end of its always cranky lifetime. Sewing machines had, in my absence, become computerized. And they could do fabulous things, like embroider. So I began visiting sewing stores. And what a shock that was!
I confess I did not demo very many machines before I bought my first truly good machine, in part because my Home Ec auntie decreed that Husqvarna was the ONLY way to go, and in part because my exhaustive online research turned up uniformly glowing reviews for Husqvarnas-Viking (HQV) machines. The HQV website was very much better than most and their customer service department responded rapidly, intelligently, and sympathetically to my questions.
But I was sadly handicapped when I went out to actually look at machines. I was entirely unprepared for the pernicious dealer system that is, unhappily, the signature feature of the sewing industry. The larger manufacturers demand that dealers only sell to those customers who reside in their sales area. Which is all very well if your local dealer is top notch, and hires top notch staff, and if you never move, and if you actually HAVE a local dealer: if you live outside a large metropolitan centre, all bets are off. To ensure that you, the customer, cooperate with the dealer system, your warranty is only valid at the dealer you originally purchased from, and the much vaunted lesson and "support" packages are only valid from your purchase point as well. Too bad if you move, or your dealer retires or goes out of business. The warranty and support are not transferable. They are not attached to your machine or you; they are attached to your purchase dealer. And to further force you to fall in step with this system, the manufacturers and dealers will not advertise prices (a mainstay tactic in all price fixing systems), and will not quote over the phone, email, or postal service.
Since when is the price of consumer goods a state secret???
I can only conclude that this archaic "hog tie you to a dealer" system, which even the automobile industry abandoned long, long ago, is a direct reflection of the fact that the sewing machine industry has written off their typical customers (women) as stupid, easily manipulated persons with zero access to discretionary purchasing decisions, and zero ability to outwit the corrupt dealer system.
So when I walked into my local dealer, I made every rookie mistake.
First, I chose the dealership (there were 3 within an hour of my home) that was most highly rated by the HQV website. I did not realize that they were considered best on the basis of sales volume...which set me up for a high pressure sales experience. At the time, I was not only unprepared for a high pressure sales pitch, I was inexperienced and darned uncomfortable with them too.
My first experience in the shop was sticker shock. Prepare yourself ladies, because as shocked as I was then by the price of new sewing machines, they have tripled in price since. At the time I went in to check things out, I expected to pay around $700 for a really nice machine. How wrong I was. The top of the line (TOL) machine at that time was around $6000. It sewed beautifully. It had auto functions, a computer screen in the front, stored hundreds of specialty stitches, boasted an auto threader....and it embroidered. Well, not quite. It embroidered no more than the few designs they gifted you on a floppy disk UNLESS you purchased approximately $2500 worth of proprietary software. Then you could embroider all kinds of stuff. But only HQV designs. Which cost about $125 a disk...on average $10 per design, roughly.
Happily for me, I was at least computer savvy, unlike HQV's target demographic (which I regret to say was retired, elderly ladies with husbands who controlled the family budget...note that the sewing machine industry has still to accept that this may not be their target demographic at all). No way was I ever going to buy proprietary software of any stripe! Open source code was already a hallmark of the computer world, and that would certainly mean "inexpensive work arounds and competitors" to all this klunky sewing software. So I think my response to the astronomically priced HQV embroidery software was an ill considered "You must be kidding me! A first year programming student could knock this off in a weekend!" The dealer shot me a very sour look at that point.
I dutifully demo'd the models that fit my budget, a bored dealer at my side. At the time that was the Husky line (sadly, also an economy Canadian gas station franchise)...Asian made mechanical machines. They were good, but there was no question in my mind I wanted the feel of a computerized machine. Smooth and powerful. After years of fighting a cranky, clanky mechanical, I was very clear on that.
I surveyed the entire line, and settled on the relatively new Interlude 445 for very solid reasons. It was computerized, offered an auto buttonhole attachment and some nice, very tasteful and elegant built in decorative stitches. I was tempted by the very new, more luxe Platinum line, but at the lower end, all they really had over the Interlude was an automatic threader and the Interlude had a little gadget that did that anyway. And looking at the top of the Platinum line, it made absolutely no sense to choose one of those rather than the TOL Designer 1 instead. I did not have the $6000 the D1 cost, so bought the $1200 Interlude 445 floor model (it cost $1600 new). My husband nearly divorced me over that sticker price. I was so upset by his disapprobation I could hardly bring myself to sew again. It took me a long time to get over the guilt. Finally, I realized that no matter what this hobby cost, it was something I loved, and a zen retreat for me. I was worth that. And life is to enjoy.
Which meant that, within the legal "trade up period" that is a hallmark of this industry, I decided to go for it and buy a used D1. While the used machines do not have a warranty (the 20 year warranty expires with original ownership), I knew that these well made machines are relatively trouble free, and I also knew that the warranty didn't always cover expensive problems. I realized the difference in price between the new and used machines leaves you a lot of room to pay for repairs (and lessons if you need them, although all kinds of support is available online). And since I was also fortunate enough to have found a wonderful independent sewing machine tech in my area, I knew I would have backup if anything did go wrong.
The dealer agreed to let me know when one came in, and one did...for $4000. I said I would take it and never heard back from her. I guess she had no desire to have my Interlude back in her shop, and got a better price elsewhere. I was equal parts disappointed, humiliated and angry: the average machine purchaser will make hundreds, if not thousands, of dollars of accessory purchases on top of their original machine purchase, and I was no exception. But as "my" dealer treated me so shabbily, I took my business elsewhere. Not only were there other dealers in my large metropolitan area, but accessories were already widely available on the web through EBay.
After three years, I found a dealer not too far away who would talk pricing long distance and who sold me a lovely used D1 for $2200. I still have this machine, and I love it. But the only thing it does not do well is easily sew the perfect 1/4" seam demanded in quilting.Turns out that while Husqvarnas are stellar at everything else, their wide feed dogs mean they do not excel at sewing curves and quilting a stress free 1/4" seam. Using the 1/4" foot, the edge of your fabric barely falls onto the right feed dog. This means the left feed dog pulls the fabric more securely, and at the beginning and end of seams, particularly on small pieces (like ones you use in quilting!) the fabric pulls to the left. This swinging of the fabric can be controlled, but it takes a lot of concentration to do so. Since 90% of quilting is sewing a perfect (and I mean PERFECT) and predictable 1/4" seam, I consulted with my quilting teacher and went in search of a good, used Bernina with narrow (5.5mm) feed dogs. Some Bernina models offer the narrow feed dogs and the traditional Bernina vertical hook system, which produces an incomparable straight stitch and a stress free 1/4" seam. This is getting pretty picky, as the HQV stitch, and the wider (9mm) feed dog Bernina stitch is very, very good. But for the obsessive straight stitch fan or quilter...go narrow feed dog, vertical bobbin Bernina. Period.
Now, set up with the D1 for embroidery, lots of decorative stitches (and, when fitted with the spring loaded open toe foot, a really nice free motion machine as well), and my trusty Bernina for that 1/4" quilting seam, the only thing that remained was to consider a longarm setup. Longarm machines with stitch regulators are especially appealing to quilters like me who:
1. Do not want to put in the hours to learn good free motion quilting (most of the quilters I have polled consider that it takes 300 hours of practice to be comfortably in control of their free motion quilting).
2. Do not wish to quilt on the tiny, restrictive bed of a conventional sewing machine. You have to bundle the quilt up to fit it into the arm, and manhandle the quilt around as you free motion quilt. This is pretty darned inconvenient, and punishing on wrists and upper back. No thanks.
3. Like the idea of loading up a quilt top, batting, and back, and being able to leave it loaded on the machine, ready to be quilting when you have the time. No taking it on and off the machine.
4. You are a picky, perfectionistic Virgo like me who can't bear, absolutely cannot BEAR to see uneven free motion stitches. Note: I loathe computerized machine quilting. You might as well buy your bedding if that is what you like. Ivory rayon bedding. From K Mart! Computerized machine quilting is perfect, regular, and sanitized to the point of sterility. I hate it!
So I have decided, once I have the time to really do lots of quilting, which presently I do not have, to buy an Innova ABM longarm quilt machine. It has some wonderful, category killer features and if I had the price in my pocket today, I would buy one tomorrow, baby!
Meanwhile, my advice to you is:
1. Buy a new machine if you just have to have that brilliant toy. I do support that toy feeling. Your machine should delight you and it does not need to be practical or pay for itself to be worth your while; we are here for a good time, not a long time, so ENJOY!!
2. Buy a used machine. There are good used dealers online that you can find through chat rooms and online research. You save a bundle and if you decide you want something else....
3. Don't be afraid to buy a machine and then sell it and buy one you like better. Get what you want.
4. I learned that as enticing as embroidery is, I rarely use it. Most projects look better without the extra embellishment, and most projects look better with a little simple hand embroidery as opposed to busy, machined motifs. Decorative stitches can add subtle, elegant enhancements all on their own.
5. At last check, standalone embroidery machines meant very small embroidery fields. Since used TOL machines which both embroider and sew are now widely available, and offer large embroidery fields, try one of those out before you consider a standalone embroidery machine.
6. Don't underbuy. Just because Grandma only had access to one straight stitch and one zigzag stitch doesn't mean you should too. Get a machine with some features that delight you. Get a machine with features that challenge you to try something new. Feed your creativity, don't restrict it.
7. Take advantage of the many support sites on the web. There will be chat boards, user groups, blogs and tutorials on any and everything you could possibly want to know about or do with your machine. If you have a great local dealer you can run to, that's great, but most of us do not. And if you are homebound with small children or a tight schedule, it is more convenient to get support online anyway.
I hope your sewing table gives you as much fun, relaxation and creative pleasure as mine does. Cheers!
Tuesday, February 2, 2010
Tools of the Trade
I love to write, and have been working on creative writing projects of my own. Contrary to popular mythology, I find the lonely writer does not sit down at the keyboard, open up a direct line to the muse, and begin spewing beautiful prose onto the screen. Writing well involves a lot of research, a lot of organization, and achingly difficult bridge-building between ideas. It takes all that, and a vast amount of uninterrupted solitude, to make the artifice sound and feel like the real thing.
One device that has helped me enormously is simple worksheets for organizing timelines and events. I have devised two .pdf's, nothing fancy, for doing that over a 12 chapter and 16 chapter framework. Help youselves!
I would also like to put in a big plug here for a very nicely engineered, inexpensive writing software. I have been using Write It Now for a few years and I love it. Packed with features, but simple to use, a very easy learning curve, but a very flexible, writer oriented program. Check it out.
Subscribe to:
Posts (Atom)