Subscribe to RSS Feed

Tuesday, November 29, 2011

Those Blanket Things...how to value a quilt.

Wise to the exigencies of medical practices, and while waiting for the endodontist to finish with an emergency patient, I quietly pulled my bag of handwork out and began hand quilting a small, colourful block in bright, heavy threads. When the doctor finally arrived, he looked at my lovely folk art block and said, bemused "Hmmm. We had a lady here who used to make those...those...blanket things!".

Indeed. I do make "those blanket things". A lot of us do!


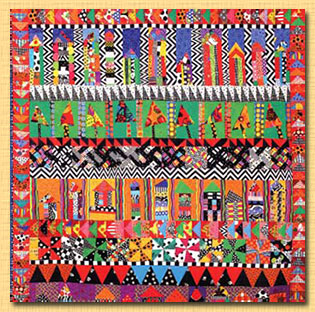
The auction quilt pattern...

Consider the following scenario in an email from quilter Betsy:

"Do you remember the fundraiser auction for Zach's [her son] elementary school? And how we consulted on fabric and colour choices that would be likely to have broad appeal and be sure to ignite a bidding war? Well, the auction went off last night and guess who bought the quilt? Me! The bidding stopped at $45, and as the auctioneer called, "going twice...", I jumped in and bid $60. Donny [her husband] thought I was crazy until I whispered to him that the quilt cost me $80 in materials alone, and it took at least 12 hours to make (it was a strip design, so went together quickly). Fairly valued, even with my time at rock bottom minimum wage, it probably cost $225 to make before factoring in the cost of my machines, tools and training, or a profit margin. I would rather gift it to someone who appreciates it and consider my $60 bid a donation to the Zach's kindergarten class. He raised his eyebrows at that but was even more surprised when three of the moms from the school approached me later and asked if I did custom work...they loved the lap quilt and really wanted one of their own, but in colours to match their decor. When I explained to them I would be happy to make them lap quilts, but handmade quilts like these, depending on the complexity of the design and quilting would start at $300. The moms were totally surprised, and a bit miffed too. They just did not believe a quilt could cost that much to make, and thought I might be padding the quote. One actually said (fingering my lap quilt) "my mom just gives these away". Donny turned to me after and said "wow, were they pissed!". I was angry too, and hurt. Nobody understands the value of what we make."

I have had similar experiences, and in my pre-quilter life was guilty of similar trespasses. In an age when you can get a "bed in a bag" from a big box store for $49.99, no one understands what actually goes into a hand made quilt. Even those people who say, and I hear it a lot, "oh! I sure wish you'd make me a quilt!". Quilts are undervalued in our culture.

This fact was brought home to me when friends at a camping trip noticed the lap quilt I had brought along for chilly evenings. They all oohed and ahhed, and then somebody said, "we'll just call you Martha from now on!". As in Martha Stewart. Which is code in hen-peck for "frumpy and funny". And when asked about doing one for each of them, I gave a quote like Betsy's, and was met with a similar level of astonishment...and hostility.

Why hostility, I wondered?

I have certainly encountered the pioneer myth...that quilters are saintly creatures who, toiling by lantern light, make transcendent quilts out of the treasured scraps left over from worn out family garments. Evidently Mother loves her family so much that even the clan rags are as silks to her! The domestic goddess' time is considered free, the materials certainly free, and the work is valued accordingly.


And part of the explanation seems to be that in a post-feminist revolution world, many women are themselves uncomfortable with the traditional domestic arts and pursuits. They have worked so hard to be seen as more than mothers and housekeepers, they avoid doing anything that might consign them back into those categories. Quilting and sewing, in their minds, let the side down. That makes for a disconnect: they love quilts, but denigrate what it takes to make them. It is an uncomfortable...and sad...reality. It is the unexamined life.

And we are all under considerable pressure to be something "uber". It is not enough to be "just" a person, you need to be a superstar in your own life, which itself is an unending, engineered stream of Hallmark Moments. It is important to impress others, to be awesome in every sense of that word. It goes beyond healthy ambition, into some shadowy need to be "more than", to be a celebrity, to be recognized as first, best and always. And it often strikes me that there is considerable pressure now to justify your tenure on this earth. You must be a warrior...for peace, or for the environment, making a contribution so huge and momentous it will get you into the Sundance film festival, the UN General Assembly, and the Sports Hall of Fame... preferably all three! The quotidian is just not good enough. This life, served straight up, is not good enough.

The quilter, quietly busy with fabric and threads, stitching her dreams and experiences into  "one of those blanket things", is creating and contributing on an entirely different level.

So, how to value that quilt?

Here is what quilting is to me. I began quilting as a young adult, in the days of cardboard templates and hand sewing. I loved the colours and textures, the contemplative nature of the slow but beautiful workmanship, the delight of tackling the learning curve, and that ineffable link to times and peoples past. When the babies came along, I put that all away...it was hard to keep the little ones out of the dangerous bits like pins and needles, and I had no space or time to shop for materials and sit and make things anyway. Once they were all grown, I returned to quilting, now revolutionized by modern tools and techniques. Quilting is now faster, fresher...

...and outrageously, deliciously, artistic.


Both pieces from the traveling collection
"Art Under the Microscope"


I have been quilting, more or less seriously, for about 4 years, and only now do I feel comfortably in control of my tools and materials. As a noob quilter, I would look at beautiful quilted works and get that uncomfortable feeling that I could never do anything "like that". Now I look at those same works and think "oooh, I can take that concept and take it somewhere!". My hard work at improving my skills and craftsmanship mean that I am inspired, not intimidated.

And inspired I am. Not just by the gorgeousness of colour and design, but by the zen healing of taking time and space (and money) out for myself, for my creation station time. In my middle fifties, I have arrived at middle age, and have begun to experience the myriad gains that were the focus of my younger self (education, marriage, children, home and travel), as well as the myriad losses that frame my older self (death of loved ones, illness, children becoming independent adults, aging). I realize now more than ever that I am here for a good time, not a long time. Certainly not the forever it felt like when I was 21.

Creation is proof and comfort against the gathering shadows. Something enduring, something that distills the joy I have been blessed with in this life.

That is what a quilt is.
A distillation of life.

Priceless.


Tuesday, October 11, 2011

The Toxic Myth of Unconditional Love

Unconditional Love: the most sparkly and toxic bit of 1970′s pop psychology!

And, alas, arguably the most enduring bit as well.

I am sorry, Virginia, but there is no such thing as unconditional love. Nor should there be! But before you write me off as an heartless monster, allow me to explain: we must distinguish carefully between two very separate ideas, “self worth” and “unconditional love”.

We all have an innate worth, one every living thing is born with. To quote The Desiderata “you are a child of the universe, no less than the trees and the stars, you have a right to be here”.

We do NOT all have, thereby, the free pass that is the heart of the idea of “unconditional love”. You may be born with an innate worth, but you are not born with the right to hurt, manipulate, or transgress against others. You are not born with a right to be loved “no matter what”.

Or, to phrase things a little differently, once you are beyond infancy, the love and respect you get in life is earned.

The phrase “unconditional love” was brought into the lexicon in response to a traditional parenting style in which love was confused with approval. “Spare the rod and spoil the child” was the motto of that particular theory of childrearing, and parents felt very comfortable withdrawing love and affection in response to misbehaviour of any sort.

This was a devastatingly effective childrearing tool in a culture that valued conformity and obedience. Unfortunately, it has equally devastating side effects. First and foremost, it strikes at the notion that you are born with an innate worth. You become entirely dependent on an external locus of control (the approval of authority figures) for that sense of self worth. And that is a very sad and destructive state of affairs.

Some bright spark realized, quite correctly, that a parent’s love should not be revoked each time a child misbehaves. Unfortunately, they responded with the idea of unconditional love; to whit that parents should love their children no matter what.

By and large, parents do feel an overwhelming love for their children. But an important piece of wisdom is missing from the unconditional love approach: namely, that love and approval are two different things. You can love your child even when you do not approve of what that child is doing. ie. "Child dear, we love you very much, but we do not approve of you bullying your friends to give you all their cookies at lunch time. Let us sit and discuss this situation and find a better way to get your needs met.”

Unconditional love is merely the film negative of "obey thy parents". Same sorry picture, image merely reversed. It keeps the worst part of "Old Testament Parenting", where love and approval are hitched together (Old Testament Parent: you only get love IF you earn approval), and replaces that sorry doctrine with the equally toxic "you always get love so you always get approval" (Unconditional Love Parent: Oh sweetie, your telling me to f**k off is wonderful proof you are secure, confident, and fearless!)

The effects of offering children that steady diet of unconditional love and unconditional approval have been disastrous. Children are particularly adept at reading "subtext", at picking up the tension generated by their parent saying one thing whilst feeling another. Unconditional love and approval parents will expend enormous amounts of money and effort in a well meant, but unrealistic effort to prevent their child experiencing any kind of failure or mediocrity. The parent will say "I am committed to my child's success and happiness in life; there is nothing I wouldn't do to make sure s/he succeeds". The child, while grateful for the interest and involvement of their parent, cannot help but read the subtext: "Kid, you really don't cut it, and I cannot bear for you to be anything less than stellar, so I am stepping in here."

And we have all met the result; adults and children who are untrained in the hard work of earning love and respect, who misbehave regularly in their relationships for the simple purpose of checking to see if they are still loved "unconditionally". Not a pretty picture!

Parents are not immune to the doctrine of unconditional love. For those of you, who like me were born before the Flood and enjoyed the theatre release of “Guess Who’s Coming To Dinner?”, you will recall a scene in which Sidney Poitier and his father disagree on the life decision Sidney is making. “I BROUGHT YOU INTO THIS WORLD, YOU OWE ME!” shouts Sidney’s dad, by way of saying children should listen to their parents and do what they are told. I was, as a child, shocked that Sidney replies he doesn’t owe his dad a thing. How could Sidney be so mean to his dad? Many years later I realized that no child “owes” his parents for the simple fact s/he was born, brought into this world, loved, fed, clothed and housed, and kept alive. When a couple conceives, they sign on for those things; indeed the right to basic care is owed to each child first by his parents, and collectively by all the other adults in the culture.

What is not owed to the child is anything much past that. Your job as a parent is to provide the conditions whereby your children can grow up into adults who can take care of themselves and their own happiness (which, incidentally, includes the ability to love and nurture others). You may choose to do more, but that choice is elective, not a moral imperative.

Our experience of love, once we are past infancy, is an outgrowth of the relationships we have. And at the core of healthy relationships are the choices we make…to be kind, helpful, loving, to support the other person, to take active good care of them as we would have others take active good care of us. We earn love and respect thereby. And we have a right to expect our relationship partners will reciprocate in kind.

There is no shortcut to earning these things, no shortcut to building self esteem. You cannot build the self esteem of another beyond telling them they have innate worth: in particular you cannot build self esteem by lavishing un-earned approval on a child. Beyond infancy, we can only earn love and self worth by accomplishing positive goals.

I will end this with my favourite quote from the Dalai Lama. It is a good phrase to live by, covers every situation, and detoxifies much of the unconditional love misunderstandings that abound in our world:

"Your task in life is to pursue your own happiness,
but only insofar as that pursuit does not compromise the happiness of others.”

Wednesday, August 24, 2011

Berries and Cobblers: Blackberry Cobbler, Berry Cobbler


I think I can confidently say that you can divide the world up any number of ways, but for our purposes today, the world contains two kinds of people:
cake people and pie people.

Hallooo halloooo and hallloooo all you pie people: I am one of your Nation!

I just love pie. More than cake. Infinitely more than cake! A good pie is a study in contrasts...flaky, crispy crust against succulent, juicy filling...the saltiness of the crust against the sweetness of the filling.
Growing up in a very small Northern-ish Ontario town, we did not have a lot of access to fresh summer fruits. Strawberries were not widely grown in the area when I was a child, and while rhubarb was plentiful, it does not on its own make much of a pie. The baskets of ripe cherries and peaches that pour out of the Niagara Peninsula did not, in the 1960's, generally find their way to little Haliburton, and when they did, it was at great expense. So the standard pies in our houshold were apple, cherry (made with E.D. Smith tinned cherry pie filling), and raisin.

Y'all who are my age will remember raisin pie. A waste of good buttertart materials, I say.

It was not until I attended university in the Pacific West that I met up with blackberries. Walking along a Gulf Island road during a camping trip with the young man who would become my husband, I noticed fat, black berries hanging off prickly, dust covered bushes. "Are they edible?" I asked. He looked at me, incredulous. "Try one", he said, and I did. The rest was history!

It became our tradition to go blackberrying every year; here the blackberries begin to ripen in August, and thanks to the cool and uncertain coastal summers, some years the entire crop fails in the face of late summer rains. Last year's crop looked to be the best ever, but as it came to ripen, we had weeks of sustained rains. The berries molded on the vine.

It was very sad.

This year we are set to have perfect blackberry weather, and I will happily carry on our annual summer tradition of "all the fresh blackberry pie you can manage while the season lasts". But I will also make blackberry cobbler...I adore fruit cobblers and turned to them when I had toddlers and no time! It is much, much easier to manage a berry cobbler recipe than a berry and pie pastry recipe; you can bung it together before the toddlers lose interest in batter, bowls and spoons, after which they wander off to get into trouble!

My favourite cobbler recipe, which I think I found decades ago in a La Leche League cookbook, features a very unusual technique for producing a crispy, sugary crust. It is heavenly with blackberries, but I can personally vouch for the fresh peach version as well. For a little preview of heaven, ladle thickened cream over each serving. Oh my.

It all comes down to this: Berry Cobbler...

 
Crispy Batter Cake
350o, 45-60 minutes

 2 c. berries (my favourite is blackberries) and/or sliced fruit (sigh, Ontario peaches!)
Juice of half a lemon (add in a bit of zest, too!)

Batter:
1 c. sugar
6 T. butter
1 c. milk
2 c. flour
2 t. baking powder
½ t. salt

Topping:
1 c. sugar
2 T. cornstarch
½ t. salt
1 1/2 c. boiling water

-preheat oven
-prepare a lasagna or large cake pan (8” x 13”) (butter, flour)
-spread cleaned fruit on bottom of pan
-sprinkle with lemon juice and zest

-in a large bowl, cream together sugar and butter
-whisk together in another bowl the flour, baking powder and salt
-add flour mixture to creamed mixture alternately with milk
-pour this batter over the fruit in pan

-for the topping, combine the sugar, cornstarch and salt, sprinkle all over top of batter
-immediately before baking, pour the boiling water over the topping and batter (really!!)

Batter cake is done when deep golden brown.

Serve with cream whipped just enough to be thick, so you can drizzle it from a spoon, all over your gorgeous cobbler! I prefer a Chantilly cream, ie. whipping cream with a bit of sugar and vanilla added.

Or serve with ice cream (but try that thick cream, it is fabulous!).


Monday, August 22, 2011

Ode to Half Square Triangles (HST's): how to make half square triangles

" If you can make Half Square Triangles, you have mastered 95% of quilt patterns."
Brenda Brayfield, quilting teacher extraordinaire

Simple blocks like Pinwheel and Card Trick,  sawtooth borders,  complex blocks like Crown of Thorns or Bear's Paw; all are built on that rock-solid chassis of quilting, the Half Square Triangle (HST).


http://sewmamasew.com/blog2/2010/04/simple-triangle-block-sew-along/

HST's are single handedly responsible for the oft repeated sentiment amongst non-quilters that quilting is just too danged fussy and all quilters are joyless perfectionists. While it is true that HST blocks do not look their best when inaccurate, I  would like to rephrase the above criticism and say "there are few sights as pleasing as a quilt constructed with clean, sharp points; the effort required is well worth the heartache involved!".

The illustration below details the traditional method of HST construction, where two squares are layered together, sewn with a double seam on the diagonal and cut apart. This is generally the first method you will be taught in any Quilting 101 course:

http://www.popularpatchwork.com/news/article.asp?a=6842


I might as well come out and say it now...I hate this method! There are so many steps in which one can make tiny accuracy errors, and invariably, no matter how careful I am, I make enough to render any HST project an exercise in endless frustration. I like HST's, but I like them dead accurate with clean and sharp points; they just look so darn pretty that way!


Not only is the traditional method demanding in terms of accuracy, it is S--L--O--W. Slow as treacly molasses! Many quilting projects made with blocks constructed using HST units demand the production of scores of HST units, ditto for patterns using sawtooth borders, so it was with some determination that I went in search of a method of HST production that was not only easier to get right, but faster to get finished.

Mercifully, there are many other ways to make HST's!

The first method I turned to was the "no waste" method. I was not particularly motivated by low or no waste...after having to discard several blocks worth of work and materials thanks to accuracy issues, I realized that the lowest waste is generated by the most reliable route to accuracy! Below is a quick illustration of the classic no waste method:

http://learn2quiltonline.blogspot.com/2011/01/how-to-make-lots-of-half-square.html


You simply put two squares right sides together, sew around the edges with an accurate 1/4" seam, and cut the sewn shape apart on the diagonals. VoilĂ , you now have four Half Square Triangle units! The major drawback here is that you are left with a lot of exposed bias edges. Not too big a problem if, like me, you wash, dry and starch your raw goods. A good starching gets you through a lot of bias issues! The major advantage of this method is that you get four HST's at a time (note: 4 HST's = 1 pinwheel). Faster, but still not fast enough.

There are plenty of HST rulers out there...essentially you sew strips of fabric right sides together, and cut them into triangles, which unfold along the sewn line into half square triangles. I tried a few of these clever rulers, but they were not much more accurate than the traditional method, and a bit tricky to cut out with the rotary cutter. And while faster than the traditional method, the ruler method was still too slow for my purposes:

http://carole-quiltingadventures.blogspot.com/2011/02/mass-production-half-square-triangles.html

**For all of the above methods, I found it was best to admit that I was going to have accuracy problems, and to make the HST's slightly over size, then cut them down to the required size and accuracy:

http://www.frugalquilting.com/triangle_half_square.htm


Finally, I was pointed toward Half Square Triangle papers. You can get these through a variety of sources...there are free downloads on the web and there are commercial products, ie. Thangles. Both are great methods, very quick and very, very accurate!

But in the end, my own addiction to HST projects, particularly the construction of pinwheel blocks, of which I am inordinately fond, led me to the Triangulations CD  . At last I could easily print off triangle paper (I use copy paper quite successfully) of any required size, and end up with loads of HST units sewn with maximum efficiency and truly impressive accuracy.


This was the answer I had been searching for! My approach now is to sew up sheets of the Triangulations sheets in whatever size is required, pop them into a work bag with a pair of scissors, and then when I need to keep my hands busy ie. watching tv, on the bus etc., I take out a sheet, cut along the lines, remove the paper from the HST's, and put them aside for pressing.

When assembling HST projects, I like to keep my seam lines aligned, and work carefully to ensure my points come out neat and sharp. To do this, I press seams open, and pin carefully with fine pins on either side of where seams join. This prevents the seams from shifting apart during sewing. And I am very careful to sew with a very accurate 1/4" seam. You can also watch your seam lines as you sew the points together to make sure you sew right across, but not above or below, the point itself. And I am not afraid to rip out when a point is either buried or left floating.

(the one exception to this approach is when I am making deliberately wonky, folk art type blocks or units, Ă  la the Collaborative/Liberated Quilting method I learned from Freddie Moran and Gwen Marston. That method demands you pay attention to balance and design rather than perfect accuracy)

Here is a shot of one of my "made it by accident" blocks, one I ended up liking very much and used in a nice little lap quilt I have under construction. HST's look fabulous in black and white prints...give it a try in your next project!


Saturday, July 16, 2011

Pillowcase Party

Are these not gorgeous!!!???


I had a bit of pillowcase madness last fall, when I decided to buy massive amounts of Christmas flannels and sew up Christmas/Winter themed flannel pillowcases as stocking stuffers for pretty much everyone on the gift list. I think I sewed up about 30 pillowcases by the time I was done.

In our house, we love the holidays and the challenge is always to add that special holiday magic to the season even as we fall farther away from our more traditional religious childhoods and families of origin, and are increasingly pulled into the commercialism that we now all associate with the holidays. Years ago we began adding in little traditions of our own, beginning with what is now a gargantuan holiday/winter mug collection that is brought out of the attic on December 1st, and returns to the attic on January 1st.

I decided the same approach would work well with holiday themed pillowcases. The trick was finding fabrics that had that truly magical feel, that "can't go to sleep on Christmas Eve/miracle of falling snow" component.

Luckily, in 2010 there were a couple of good holiday flannel releases, and I had tucked away a fabulous print from 2008...not sure at the time what I would make with it. Here is a detail from the set I made for my bed (the snowman fabric is the body of the pillow):


I used the now famous "sausage roll" pillowcase method, the pattern for which is now available all over the web (I have used the Rainy Day Quilt School tute) and is filmed on Youtube.

Sadly, the 2011 flannel releases have been thin on the ground. There are a couple of nice cotton lines out there, but very little flannel done in sufficiently lovely and magical winter/holiday themes. Shelly Comiskey's "I Love Snow" is so far the only line that strikes me, but I keep my antennae up at all times for great flannels: flannel prints in designs and colours that appeal across all ages and sexes as well.

Back to my luscious, '60's floral flannels, above. Once transmuted into pillowcases, they will go into our camping gear, and become a nice little tradition for our summer excursions. 

What flannels are your favourites?

Update Sunday July 11
 The first of my popart pillowcases are complete! 

Tuesday, April 5, 2011

Collaborative Quilting Part III: Deconstruction

One of the very best things about the Gwen Marston Freddy Moran books is that they have, particularly in the second volume, taken some time to point out critical &/or significant design elements. That practice not only gives the reader and student a nice peek into the Freddy and Gwennie design process, it helps inform your own process. Marston and Moran place a high value on the inclusion of unexpected elements, which by confounding expectation, cause our eye to stop and say "hey, what gives??" This forces you to look carefully at the composition, and have a little conversation with the quilt in hand.

A perfect example of this approach is represented in the quilt below:


 Photo from the Sue Spargo blog, taken at Sisters, Oregon. Quilt by Marston and Moran, "What a Star!" p. 186 of "Collaborate Again"


First, the colours. Not many times in our quilting lives do we finger a schoolbus orange fabric sprinkled with red dots and say "hmmmm, what a fabulous background fabric this would be"! And yet, it works so very well here. In the notes on this quilt, the makers point out the salient design elements: mixing of liberated and traditional (precision) pieced elements, filler strips both pieced and plain, split blocks, unexpected colour shifts in the sawtooth borders. In addition, you can see blocks constructed of both high and low contrast elements ie. stars that stand out from their background fabric, and stars that blend with it; a small twist on the traditional that makes you stop and look around the quilt for similar unexpected elements.

It becomes clear as you examine the quilt that these unexpected, non-conforming elements give the quilt its charm and depth of character.

I have become especially fond of those filler strips. They are, all on their own, tiny design challenges.

You could lay in a simple strip of fabric, but what if you decide to take that space and fill it with a custom-designed filler composition instead? Will you use tiny stars or tiny Freddy's Gardens? All elements the same size or different sizes? Floating on the background fabric or a new fabric? Sashed? Split?

I was particularly charmed by the row just inside the outer black & white sawtooth border, which features regular blocks of either stars, churn dash, or broken dishes. That's interesting enough, but the spaces between the blocks, normally reserved for plain background fabric, have instead become mini design fields containing smaller and interestingly placed stars, churn dashes etc.

And do I need to point out the border of wiggly coloured lines on black? I'd like to meet the fabric designer who had the guts to submit that design for printing! That fabric is wild, strikes me as rather grotesque, and I can't imagine saying "I'll take 3 yards!"...but it totally works in this quilt.

We talked in class about what drives the composition of a quilt like this, and how you digest it visually. For me, a successful quilt evokes pure emotion, and from the Marston/Moran quilts I get a jolt of unfettered  joy. These are not particularly restful quilts, but they are vibrant, resonant, and engaging.

Like most good friends.

p. 102/103 Collaborative Quilting
Part I
Part II

Monday, April 4, 2011

Collaborative Quilting Part II: Fabrics

It is worth taking a moment to discuss the fine points of fabric acquisition.

To gear up my stash for the Freddy Moran and Gwen Marston experience, I first turned to collecting black and white fabrics, something completely new to me. I was astonished at the variety available (having never noticed them before, **blush**), and at the effort fabric houses are putting into creating new and useful black and white prints. I quickly learned that these prints fall into three categories: prints that read primarily as black, prints that read primarily as white, and prints that read as grey. This last group, the busy and generally small scale black and whites that read as grey, are of limited use in the Marston/Moran style of quilting. In general, any fabric that is middle of the road in terms of contrast value, neither high nor low contrast value, adds to the "mush factor" in these quilts.

Many of us have experienced the mush factor via charm pack projects: if you construct a project out of charm packs in any one collection, the fabrics all fight for your eye time, and individual, lovely prints (no matter how prettily they match in terms of palette) get lost, utterly lost, in the visual confusion. The way to remedy this is to add high contrast sashing or rows, and this baby quilt pattern from the Moda Bakeshop site is a perfect example (below). The busy-ness of a charm pack has been pleasantly tamed by the visual rest-stop offered here by white fabric:


Marston and Moran use black and white to accomplish the same end, often sprinkling in "reads as black" or black fabric through the blocks themselves, and/or using black and white sawtooth or checkerboard strips to visually separate the more colour-full elements. Note that even in sawtooth or checkerboard construction, high contrast is a must for clean, sharp and sophisticated design. I quickly found that in making my first strips of sawtooth that the best look came from pairing one "reads as white" fabric with one "reads as black" fabric.

Also useful are fabrics which are some variation on black and white stripes: a big favourite of mine has been this wonderful irregular stripe:  Micheal Miller "Ebony Reeds" CX-3529:


In terms of choosing coloured fabrics, Freddy advocates (wisely) the choice of highly saturated, pure colours, that is to say, colours that are not tinted with black or white. Designers like Brandon Mably and Jane Sassaman spring to mind here, but most bright collections (ie. Moda's "Happy") will contain some winning pure saturates.

The timing of my first visit to Back Porch coincided with the release of the Kaffe Fasset "Spots and Dots" line, and the fabric below revealed itself as one of my "super fabrics", a flexible mixer in clear colours that pleased my eye greatly:


And it turns out, bright polka dot fabrics in all scales will be a good addition to your Collaborative Quilting stash. Brightly coloured stripes, again in various scales, are also reliable stash bets. Both spots and stripes make fabulous binding fabrics.

When it comes to putting these brights together, keeping the contrasts dialed up is again the key to success. You want to include in your base fabrics high value and low value along with high hue balanced against black or black and white. In my mug rug photo, repeated below from an earlier blog post, you can see the contrast principle at work:


The centre black and white is small scale (and also dotted), and balances against the third row of larger scale, rectangular black and white stripes. The sapphire spot fabric is paired with a glowing cerise and orange stripe (so again, round with squares/rectangles, and hot colours paired against cool colours). Turquoise appears in many of the prints but is not dominant in any. The binding works not only in picking up that turquoise, but offering a dramatic hit of black. I stitched in the ditch (so as not to muddy the clear colours) with a variegated yellow and orange thread, which shows really nicely against the sapphire blue backing (the blue from Patrick Lose's "Mixmasters Dot to Dot" collection).

To begin with, I simply chose fabrics from my stash and laid them against each other on my cutting table. It quickly became clear which paired in a pleasing yet dramatic way.

Working in small projects like these mug rugs is a great way to experiment with colour and design without committing to a huge and expensive project. Liberated log cabin mug rug projects are especially well suited as a learning curve project in colour and design.

Past choosing small projects, I found that in tackling my class project, really my first "Freddy and Gwennie" project, using a strip quilt format worked well. I sewed parts into strips (ie. a strip of pinwheels, a strip of flying geese, a strip of 16 patches on point). Why? Because on the design wall, you can easily lay your strips side by side and start shoving them around into pleasing arrangements. It quickly became clear what background colour for my setting squares worked well, whether to add borders on all sides or just 1 or 2, what sawtooth and checkboard elements worked well between strips, etc.

Where did I get all these fabrics? I shopped brick and mortar when and where I could, faring well at Back Porch. But most of my local fabric stores are heavily traditional, and most in any case only stock a limited number of the new collections, and a limited selection from any one collection at that. Online vendors were a big help, and I could scan their offerings fairly quickly and comfortably, particularly when they allowed sorting the fabric images by colour. I find screen representations surprisingly accurate.

A good site to begin with is www.quiltshops.com, and from there I shop hard for free or no shipping. I like Desperate Quilters and  Quilt Expressions  in  particular, not just for their selection and pricing, but the fact they tuck fun and useful little gifts (like note pads, pencils and pens) into my orders. Thanks, ladies!!

Other online shops I have used include FabricWorm, EQuilter, Fabric Shack, From Here to Quilternity, Hancock's of Paducah, Pink Chalk Fabrics, Sew Mama Sew. There are tons out there, you just have to track down the fabrics you are after, and using Google Images is a good way to turn up hard to find fabric sources. Incidentally, a good online fabric house will advise you if they are not able to fill your order precisely, and will give you the option of adding another fabric before placing your order. Since I often gauge my order to be maximum yardage for a shipping cost category, it can be a real extra cost to me when the fabric house ships me a short order. I track my shipping cost per fabric yard quite carefully.

Enough for today!

(to be continued...)


Sunday, April 3, 2011

Collaborative Quilting Part I:Empty Spools Seminar, Asilomar by the Sea

It all began with a decision to take a long overdue romantic weekend away together, for which we chose the Monterey Peninsula, booking a stay at the transcendent Old Monterey Inn. During the course of that delightful weekend, I followed the advice of fellow Stitcher's Guild posters and popped into Pacific Grove's Back Porch Fabrics. Not only was Back Porch the single best quilting store I have ever been in, the selection of quilts hung on the high walls was gallery-worthy. I was struck by one in particular, similar to this one, below:

Based on "Sticks" by Marston and Moran


Now, I am not a huge fan of modern and abstract quilts (perhaps blinkered by my Virgo nature!) but this one really spoke to me. Under the quilt was the tag "from page 180 of Freddy and Gwen's book". I found a book by these ladies and quickly turned to page 180 only to find a page on making liberated star blocks...and realized that there were TWO books! The first was Collaborative Quilting, the second was Freddy and Gwen Collaborate Again. I bought them both.


These books were a revelation. Never before had I seen such masterful colour handling, and such an unfettered, joyous approach to quilt design. Best described as "sophisticated-primitive", the designs are based on elements in traditional quilts, but respun in a modern esprit, in modern fabrics.


I took the books home and read them, scanning the photos over and over. I definitely wanted to make something like these, so I went hunting for a workshop by the authors. First in line was a 5 day seminar hosted by Empty Spools, on the ground of Asilomar Conference Centre in good old Pacific Grove. The stars were obviously lined up, so I signed up.

The format of the class is to prepare a number of parts with which to stock what Marston and Moran call "The Parts Department". Living on opposite coasts as they do, they make stacks of quilt elements independently; blocks of various sizes in stars, churn dash, pinwheels, flying geese, free form houses and trees, even chickens and Freddy's signature "Freddy's Garden" blocks. Whether precision pieced or made in a casual "liberated" style, these are made in a rainbow of colours, and to prevent visual overload, are judiciously balanced with strips of black and white elements; sawtooth, straight strips or alternating black and white blocks. These disparate, pre-made elements are brought together when the authors meet, and they design directly with the parts, up on the design wall. The quilts tend to come together very quickly out of a well stocked Parts Department.

In preparation for class, then, I had to put together some parts of my own, and a quick survey of my stash revealed a complete lack of suitable fabrics. I am young in quilting years, having taken my Quilting 101 class only three years ago. And having spent the intervening years largely focused on building my nascent precision piecing skills via kit projects, not only was my stash small, it was very traditional. And I didn't have a single solitary black and white fabric. For the Freddy and Gwennie style, that would simply not do. Mercifully, Christmas was just around the corner, so I used my tidy sum of Chrismas present money to lay in a suitable range of fabrics, largely by shopping online. I hunted up online fabric houses that offered low or no shipping for large orders, and scanned the sale offerings, which often feature bright, outlandish fabrics perfect for the Collaborative Quilting style, but anathema to the more traditional approach. And I got a swatch card for Kona Solids, and stocked up on saturated solids.

As the eye-popping packages began to arrive, I quickly found that certain patterns and fabrics really stood out as particularly well adapted to this new approach. When one of these super-fabrics appeared, I would re-order, stocking 5 yards against future quilts and parts. To my surprise, my favourite pieces leaned heavily toward a sapphire blue/orange combo, and the turquoise and red combination from one of the Marston/Moran quilts. I found myself using colours and combinations I had never dreamt of before.

Given that this saturated palette, balanced by blacks and whites, was new to me, I decided to make a series of "mug-rugs" (aka coasters) in which I would practice my noob colour handling skills:


That proved to be a very good beginning exercise, and I really love using these mug rugs under my endless cups of tea! They also save my cutting mat from warping under the hot cups...

Over the 4 months or so before the course, I made up lots of pinwheels (focusing on combining a black based print with coloured fabric), liberated stars, Freddy's Gardens, black and white sawtooth, nine patches (made of 1" strips), and 16 patches (made of 1 1/2" strips). 

I learned quickly that when new fabrics arrived, it paid to cut three 1" strips, and three 1 1/2" strips right away, and then sort them into drawers by light/dark/black & white. 

 After my shopping spree was over, I had small Rubbermaid drawer units:


filled with sorted strips. I could then, at leisure, pull out sets of strips, sew them together, and then when cut into the actual base units needed for assembling the 9 or 16 patch units, stow those base units in their own drawer, ready for assembly. In this way, I could slip up to my studio and sew up a few units without any need to do design or cutting work, meaning even small chunks of time were  highly productive.

This suited my situation perfectly...not only was I able to fit sewing in and around my usual roster of chores, but we are very involved currently providing support to a dying family member. The intensity of that situation leaves us mentally and emotionally "on empty" when we get home, and I found the simple sewing of units together from pre-cut elements the perfect way to zen out and regenerate. And working with the cheery colours and finished units was a real joy and solace in a dark and sad time.

Having all the base bits ready to go also helps you make the colour quotient in the 9 and 16 patches truly random as possible, which is the aim. For most traditional quilters, the most difficult element of the Collaborative Quilting style is letting go of the urge to match things! These quilts do not tolerate the quilter being "matchy". Balance and  proportion are brought about by clever manipulation of the groups of elements, not so much by planned colour work.